

Installing a JoJo tank for redundant water supply ensures that when the municipal line fails, your home remains pressurized and functional. This setup typically involves a "buffer" or "inline" configuration.
Core Components
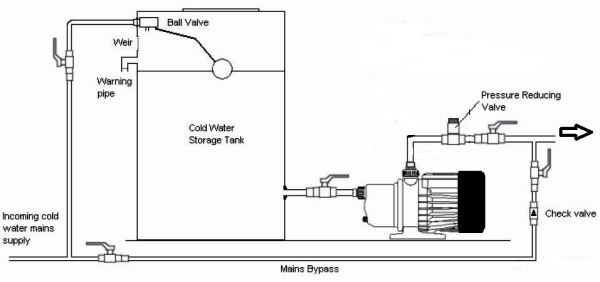
To create a reliable backup system, you will need:
- The Tank: Sized based on your daily consumption (a 2,500L or 5,000L tank is standard for most homes).
- The Pump: A centrifugal or booster pump to provide pressure to the house.
- Controller: An automatic pump controller that turns the pump on/off based on water demand.
- Filtration: A pre-filtration unit (to catch sediment from the mains) and often a post-pump filter for sediment and chlorine.
Installation Steps
1. Base Preparation
The tank must sit on a perfectly level, solid surface. A 100mm reinforced concrete slab is the gold standard. If the base is uneven, the weight of the water ($1,000\text{ kg}$ per $1,000\text{L}$) can cause the tank to crack.
2. Plumbing the Inlet
Connect your municipal supply line to the top of the tank. Install a high-pressure float valve inside the tank. This works like a toilet cistern: when the tank is full, the valve shuts off the municipal flow.
3. The Pump Connection
Install the pump near the base of the tank. Use a flexible hose or "pump connector" between the tank and the pump to absorb vibrations.
Note: Ensure you install a non-return valve on the municipal line entering your property to prevent your tank water from pumping back into the empty municipal grid.
4. Bypass Assembly
It is best practice to install a three-way bypass valve system. This allows you to:
- Run the house directly from the mains (normal operation).
- Run the house from the tank via the pump (backup mode).
- Isolate the tank for maintenance without losing water to the house.
5. Electrical Setup
The pump requires a weather-protected power outlet. Most residential booster pumps run on standard 230V power. It is highly recommended to use a pump with dry-run protection to prevent the motor from burning out if the tank runs empty.